Saving an Image Preset
Introduction
You can save a custom image preset. For example, if the Lung preset does not have the window level you want, you can adjust the window level and save a Lung preset with your custom name. You can also edit preset settings (i.e., name, shortcut, WC, WW), as well as the order of usage if multiple presets are assigned to the same hotkey. In addition, you can delete your custom image preset.
|
Note: |
|
Steps
- Right-click the image to display the image context menu.
- Select Image Presets
> Save Image Preset.
The Create New Image Preset dialog displays.
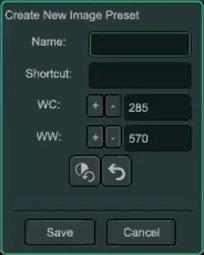
- Select a unique name that is two to 32 printable characters in length.
- Optional: Assign a keyboard shortcut (press 0-8 on the NumPad or CTRL + 0-9 on the NumPad).
If multiple presets are assigned to the same hotkey, the order in which they are configured displays to the right of the dialog. For example:
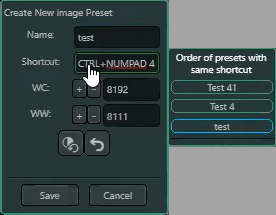
The newest preset will default to the bottom of the list (in the example, "test" is the latest preset assigned the hotkey CTRL + NumPad 4). The order of listed presets can be reconfigured by dragging the preset up or down in the list.
Note:
The order of presets is relevant when using an assigned hotkey to apply a preset to an image. If multiple presets are assigned to the same hotkey, the presets will cycle through the order as configured in this list when pressing the associated hotkey to apply the preset to the image.
- Optional: Adjust window level settings for the image. Press the "+" or "-" to increase or decrease the values.
- WC (Window Center)
- WW (Window Width)
- Optional: Click Undo
 to cancel the previous change.
 - Optional: Click Revert
 to return to the window level settings for the image when display was acquired.
 - Click Save.
- Optional: From the Image Presets context menu, click Edit
 next to your custom
image preset to modify the preset settings (i.e., name, shortcut, WC, WW). Click Save after you make the desired changes.
next to your custom
image preset to modify the preset settings (i.e., name, shortcut, WC, WW). Click Save after you make the desired changes. - Optional: From the Image Presets context menu, click Delete
 next to your custom
image preset to remove the preset. Click Yes in the confirmation dialog.
next to your custom
image preset to remove the preset. Click Yes in the confirmation dialog.
Results
Synapse saves your custom image preset in the Image Preset context menu in alphabetical order above the system presets. Your custom preset is modality specific. For example, if you create a custom preset for CT, only CT studies display your custom preset in the context menu.
Additional Options
Click Save Preset ![]() on the icon menu.
on the icon menu.
Related Topics
Keyboard Shortcuts for Presets